DIY Clothing Product Photos: Home Setup for Online Shops
Struggling with unappealing clothing photos? Learn how to take professional-looking product photos of clothes at home with our step-by-step guide. Boost your sales today!
Why Great Product Photos Are Non-Negotiable for Selling Clothes Online
In the bustling world of online retail, where countless brands vie for attention, your product photos are often the very first, and sometimes only, chance you get to make an impression. When you’re selling clothes online, this truth is amplified. Customers can't touch, feel, or try on your garments, so they rely almost entirely on the visual information you provide. High-quality product photography isn't just a nice-to-have; it's a non-negotiable cornerstone of a successful e-commerce business.
Think about your own online shopping habits. What makes you click on a product, explore further, and ultimately make a purchase? More often than not, it's the captivating image that first catches your eye. Crisp, well-lit, and accurately styled photos instill confidence in your brand and the quality of your products. Conversely, blurry, poorly lit, or inconsistent images send a clear message: low quality, lack of attention to detail, and a potential risk. This immediately erodes trust and discourages potential buyers, leading to higher bounce rates and abandoned carts.
The impact of excellent product photography extends beyond initial clicks. It directly influences conversion rates – the percentage of visitors who make a purchase. When customers can clearly see the fabric texture, the fit, the color, and the unique details of a garment, they're more likely to feel confident in their choice. Furthermore, detailed and accurate photos can significantly reduce return rates. Misunderstandings about color, fit, or material are common reasons for returns, and clear visuals can proactively address these concerns before they even arise. For small businesses and start-ups, the challenge often lies in the perceived expense and complexity of professional photography. Hiring a photographer, renting a studio, and coordinating models can quickly become a significant drain on resources. This is precisely why learning how to take product photos of clothes at home is such a valuable skill for any online clothing seller. It empowers you to create compelling visuals without breaking the bank, giving your brand a professional edge right from your living room.
Essential Gear: What You Need (and Don't Need) for Your Home Studio
Setting up a home studio for clothing photography doesn't require a Hollywood budget or an arsenal of professional equipment. In fact, many of the best tools are either already in your home or can be acquired affordably. The key is to understand what truly makes a difference and what can be skipped.
Let's start with your camera.
- Smartphone vs. DSLR/Mirrorless: For most beginner and intermediate sellers, your smartphone is an incredibly powerful tool. Modern smartphones boast impressive cameras capable of capturing high-resolution images with excellent dynamic range. They're convenient, easy to use, and often come with built-in editing features. If you have access to a DSLR or mirrorless camera, great! These offer more manual control over settings like aperture, shutter speed, and ISO, which can be beneficial for advanced users. However, don't let not having a "professional" camera stop you. A good smartphone with proper lighting and technique will yield far better results than an expensive camera used incorrectly.
Next, lighting – this is arguably the most crucial element.
- Natural Light: This is your best friend. Soft, diffused natural light is inherently flattering and free. We'll delve deeper into mastering it, but generally, a large window provides excellent ambient light.
- Artificial Light (Optional but Recommended): If natural light is inconsistent or unavailable, artificial lighting becomes essential.
- Softboxes: These diffuse light, creating a soft, even glow similar to natural light. You can find affordable LED softbox kits online.
- Ring Lights: Popular for portraits, ring lights can also work for clothing, especially for smaller items or detail shots, providing even, shadow-reducing illumination.
- LED Panels: Versatile and adjustable, LED panels can be a great investment for consistent lighting.
For backdrops, simplicity is key.
- Simple, Clean, and Consistent Options: You want your clothing to be the star, not a busy background.
- A plain white wall is often perfect.
- A large, clean, wrinkle-free white or light-colored bedsheet or fabric can be draped to create a seamless background.
- Seamless paper rolls (white, grey, or light beige) are professional and relatively inexpensive, available at photography or craft stores.
Stabilization is non-negotiable for sharp, consistent shots.
- Tripods: Whether for your smartphone or a dedicated camera, a tripod eliminates camera shake, ensuring your images are crisp and clear. It also helps maintain consistent angles and framing between shots, which is crucial for a professional-looking online store. You can find affordable smartphone tripods that are lightweight and easy to set up.
Finally, props are optional and should be used sparingly.
- Minimalist Approach: The goal is to enhance, not distract. A simple hanger, a neatly folded accessory, or a subtle plant can add context, but avoid anything that competes with the garment. The focus should always remain on the clothing itself. Remember, the less clutter, the more professional your photos will look.
Mastering Natural Light for Stunning Clothing Shots
Natural light is a gift to product photographers, especially when learning how to take product photos of clothes at home. It’s free, abundant, and when used correctly, creates soft, flattering illumination that makes fabrics look rich and colors true to life. The trick is knowing how to find and harness it effectively.
The ideal natural light source is a large window.
- North-facing Windows: If you have a north-facing window, consider yourself lucky! These windows typically provide the most consistent, soft, and diffuse light throughout the day, as they don't receive direct sunlight.
- Avoiding Direct Sunlight: Direct sunlight is usually too harsh. It creates strong, unflattering shadows and can blow out highlights, making details disappear. If your only option is a window with direct sun, diffuse it with sheer curtains, a white sheet, or even parchment paper taped over the window. The goal is to soften the light.
The time of day significantly impacts the quality of natural light.
- Soft, Even Light: The "golden hours" (shortly after sunrise and before sunset) offer beautiful, warm light, but for product photography, the hours between late morning and early afternoon (10 AM to 3 PM) usually provide the most neutral and consistent soft light. Experiment with different times to see what works best in your space. Overcast days are also fantastic for natural light photography, as the clouds act as a giant diffuser.
Even with the best natural light, shadows can appear. This is where reflectors come in.
- Using Reflectors: A reflector is simply something that bounces light back onto your subject. You don't need a fancy photography reflector. A large piece of white foam board, a sheet of white poster board, or even a white bedsheet can work wonders. Position the reflector opposite your light source, on the side of the garment that's in shadow. This bounces light back, softening shadows, brightening dark areas, and giving your clothing a more even, professional appearance.
Finally, consider the positioning of your product relative to the light source.
- Angles and Distance: Place your clothing item near the window, but not directly in the light. Position it so the light hits the front of the garment at a slight angle. This creates subtle, natural shadows that add dimension without being harsh. Experiment with rotating your garment and moving it closer or further from the window until you achieve the desired effect. The closer the light source (your window) is to your product, the softer and more diffuse the light will be.
Setting Up Your Background: Keeping It Clean and Professional
The background of your product photos might seem secondary, but it plays a crucial role in how your clothing is perceived. A cluttered, busy, or inconsistent background distracts from the garment, making your products look less appealing and unprofessional. The goal is to create a clean, uncluttered, and consistent environment that allows your clothing to shine.
- Seamless Backdrops: The gold standard for professional product photography is a seamless backdrop.
- White, Grey, or Neutral Colors: These are your best friends. White is classic and versatile, making colors pop and providing a clean, airy feel. Light grey offers a slightly softer, more sophisticated look, while other neutral tones like beige can complement certain garment palettes. The key is to avoid anything too vibrant or patterned that would compete with the clothing.
- Versatility: Neutral backdrops ensure consistency across all your product listings, which is vital for building a cohesive brand aesthetic.
You don't need to buy expensive equipment to achieve a seamless look.
- DIY Solutions:
- Ironed Bed Sheets: A clean, crisp white or light-colored bedsheet, thoroughly ironed to remove all wrinkles, can be draped over a chair or hung from a curtain rod to create a simple, effective backdrop. Ensure it’s wide enough to extend beyond the edges of your frame.
- Large Paper Rolls: Craft stores often sell large rolls of paper (think butcher paper or art paper) in various colors. White or light grey paper can be taped to a wall and draped down onto the floor or table to create a seamless curve, eliminating any hard lines.
- Clean Walls: A freshly painted, clean white or light-colored wall can serve as an excellent backdrop. Just make sure there are no distracting fixtures, outlets, or scuff marks.
The most important rule for any background is to avoid clutter.
- Ensure Nothing Distracts from the Clothing Item: Before you even position your garment, scan your shooting area. Remove anything that doesn't belong in the shot – stray objects, furniture, reflections, or anything that could draw the viewer's eye away from the clothing. Your background should be a blank canvas that highlights your product, not a chaotic scene.
Finally, consistency is paramount for a professional online store.
- Maintain the Same Background for All Products: While you might vary your angles or styling, sticking to the same background style and color across all your listings creates a cohesive and trustworthy brand image. It tells customers that you are meticulous and professional, enhancing their overall shopping experience. This consistency also makes it easier for customers to compare products on your site.
Styling Your Garments for the Camera: Presentation is Everything
Even with perfect lighting and a clean background, poorly presented clothing will fall flat. How you style your garments for the camera is just as important as the technical aspects of photography. It’s about making the clothing look its absolute best, enticing customers to imagine themselves wearing it.
The preparation phase is critical and often overlooked.
- Preparation: Ironing, Steaming, and Lint Rolling are Crucial: This cannot be stressed enough. Wrinkles, creases, and lint are immediately visible in photos and instantly detract from the perceived quality of a garment. Before any shoot, thoroughly iron or steam every item. Use a lint roller to remove any stray fibers, dust, or pet hair. A few minutes of preparation here will save you hours in post-production and significantly elevate the professionalism of your images.
Once prepared, focus on highlighting the garment's best features.
- Highlighting Features:
- Zippers, Buttons, and Pockets: If these are design elements, ensure they are perfectly aligned, clean, and visible.
- Fabric Texture: For textured fabrics, ensure your lighting enhances this detail without creating harsh shadows. Close-up shots can be excellent for this.
- Unique Details: Embroidery, prints, embellishments, or special cuts should be clearly showcased with dedicated detail shots. Position the garment to best display these elements.
For items like dresses, shirts, or trousers, you'll want to give them shape.
- Creating Shape: Flat-laid clothes can look lifeless.
- Tissue Paper or Cardboard Inserts: Gently stuff sleeves, bodices, or pant legs with tissue paper or thin cardboard inserts to give them a natural, three-dimensional shape, mimicking how they would look on a body. Avoid overstuffing, as this can make the garment look bulky or unnatural.
- Mannequins (If Available): If you have a mannequin, even a basic torso or leg form, it can be invaluable for showcasing fit and drape. Ghost mannequins (where the mannequin is edited out) are a popular professional technique, but even a visible mannequin can be effective.
One of the biggest challenges when learning how to take product photos of clothes at home without a model is showcasing fit.
- Showcasing Fit: How to Make Clothes Look Appealing Without a Model:
- Pinning and Clipping: Carefully pin or clip the back of garments to create a more tailored, flattering silhouette, especially for items photographed on a hanger or mannequin. Just ensure the pins aren't visible from the front.
- Strategic Folding/Draping: For items like sweaters or scarves, artful folding or draping can convey texture and softness.
- "Invisible" Hangers: Use clear or very thin hangers that won't detract from the clothing.
Finally, ensure comprehensive coverage with multiple angles.
- Multiple Angles: Don't just take one photo.
- Front, Back, Side: Show all major views of the garment.
- Detail Shots: Capture close-ups of unique features, fabric texture, buttons, stitching, or any special embellishments.
- Fabric Close-ups: A macro shot of the fabric can help convey its quality and feel.
By meticulously styling your garments, you bridge the gap between a static product image and a compelling visual that encourages purchase.
Photography Techniques: Angles, Focus, and Exposure
Once your home studio is set up and your garments are perfectly styled, it's time to put on your photographer's hat and capture those stunning shots. Mastering a few basic photography techniques will ensure your images are consistent, sharp, and accurately represent your clothing.
Consistency in your angles is paramount for a professional-looking online store.
- Consistent Angles:
- Eye-level for Most Garments: For most hanging items like shirts, dresses, or jackets, shooting at eye-level (or the garment's "eye-level") is often best. This provides a natural perspective and makes the clothing feel approachable.
- Slightly Elevated for Others: For items laid flat or folded, or for a more editorial feel, a slightly elevated angle looking down can work well. The key is to pick an angle and stick with it for similar products to maintain a cohesive look across your store. A tripod is invaluable here for ensuring identical framing and perspective from shot to shot.
Sharpness is non-negotiable. Blurry photos are a quick way to lose customer trust.
- Sharp Focus:
- Ensuring the Entire Garment is in Focus: Your primary goal is to have the entire clothing item, from top to bottom and side to side, in sharp focus. If using a smartphone, tap on the garment on your screen to set the focus. With a camera, use a small aperture (higher f-number like f/8 or f/11) to maximize depth of field, ensuring more of the garment is sharp.
- Tripod's Role: A tripod eliminates camera shake, which is a common cause of blurry images, especially in lower light conditions or when using slower shutter speeds.
Accurate representation of color and brightness is vital for clothing.
- Correct Exposure:
- Avoiding Over or Underexposure: Overexposed photos look washed out, losing detail in highlights, while underexposed photos are too dark, obscuring details in shadows. Aim for a balanced exposure where details are visible in both the brightest and darkest parts of the garment. Many cameras and smartphones have exposure compensation controls (often a +/- icon) that allow you to fine-tune brightness.
- Histogram: If your camera has a histogram, learn to read it. It's a graph that shows the distribution of tones in your image, helping you identify if your photo is too dark or too bright.
Colors can be tricky, especially with different light sources.
- White Balance:
- Setting it Correctly to Avoid Color Casts: White balance tells your camera what "white" looks like under different lighting conditions. If it's incorrect, your white clothing might look blueish (cool) or yellowish (warm), and all other colors will be off. Most cameras and smartphones have automatic white balance, but it's often better to set it manually for product photography. Look for presets like "daylight," "cloudy," or "shade," or use a custom white balance setting with a grey card for the most accurate results. This ensures the colors of your garments in the photos truly match their real-life appearance.
Efficiency is key when you have many items to photograph.
- Batch Shooting:
- Streamlining Your Workflow: Once your setup is perfect and your settings are locked in, shoot all similar items in one go. For example, photograph all dresses, then all shirts, maintaining the same lighting, background, and camera settings. This minimizes adjustments and speeds up the entire process, making your home studio workflow much more efficient.
By paying attention to these fundamental photography techniques, you'll capture professional-looking clothing photos that accurately and beautifully showcase your products, directly addressing the challenge of how to take product photos of clothes at home.
Post-Production Power: Editing Your Photos for a Polished Look
Even the most meticulously captured product photos benefit from a touch of post-production. Editing isn't about altering reality; it's about refining, enhancing, and correcting minor imperfections to present your clothing in the best possible light. Think of it as the final polish that elevates your DIY shots to a professional standard.
Start with the essential adjustments.
- Basic Edits: Most editing software (even free smartphone apps) offers these core tools:
- Cropping: Remove unnecessary background space and frame your garment effectively. Maintain consistent aspect ratios across your listings.
- Straightening: Ensure your product is perfectly level. A crooked image looks unprofessional.
- Brightness & Contrast: Adjust these to make your image pop without looking artificial. You want details to be clear in both shadows and highlights.
- Saturation: Use sparingly to enhance colors, but avoid oversaturation, which can make colors look unnatural and inaccurate.
Accurate color representation is paramount for clothing.
- Color Correction: This is one of the most critical steps.
- Ensuring Accurate Representation of Garment Colors: Different screens and lighting conditions can affect how colors appear. Use the white balance tool to neutralize any color casts and then fine-tune individual color channels if necessary. Compare the edited photo to the actual garment under good lighting to ensure the colors are as true-to-life as possible. This reduces returns due to color discrepancies.
Minor flaws can be easily fixed.
- Removing Imperfections:
- Dust, Lint, Minor Wrinkles: Even with careful preparation, small specks of dust or lint can appear. Use a spot healing brush or clone stamp tool to gently remove these. Minor wrinkles that were missed during steaming can also be softened or removed. The goal is to make the garment look pristine.
Your images need to perform well online.
- Resizing and Optimizing:
- Preparing Images for Web (Fast Loading Times): Large image files slow down your website, leading to frustrated customers and lower SEO rankings. Resize your images to appropriate dimensions for web (e.g., 1000-2000 pixels on the longest side) and compress them without sacrificing too much quality. Most e-commerce platforms have recommended image specifications. Save them as JPEGs for web use.
You've successfully taken great product photos at home, but there's a revolutionary next step that can transform your basic images into something truly extraordinary.
- The Missing Piece: How to Elevate Basic Product Photos to Professional Model Shots: This is where Ibdaaly.com comes in. You've done the hard work of capturing your clothing beautifully on a hanger or mannequin. Now, imagine taking that static image and instantly seeing your garment worn by a diverse range of realistic models, without the cost or complexity of a traditional photoshoot. Ibdaaly.com's AI technology allows you to do just that. It seamlessly integrates your product images onto professional-looking models, providing dynamic, lifestyle-oriented visuals that resonate deeply with online shoppers. This leap from simple product shots to aspirational model photography can dramatically increase engagement, conversion rates, and ultimately, your sales.
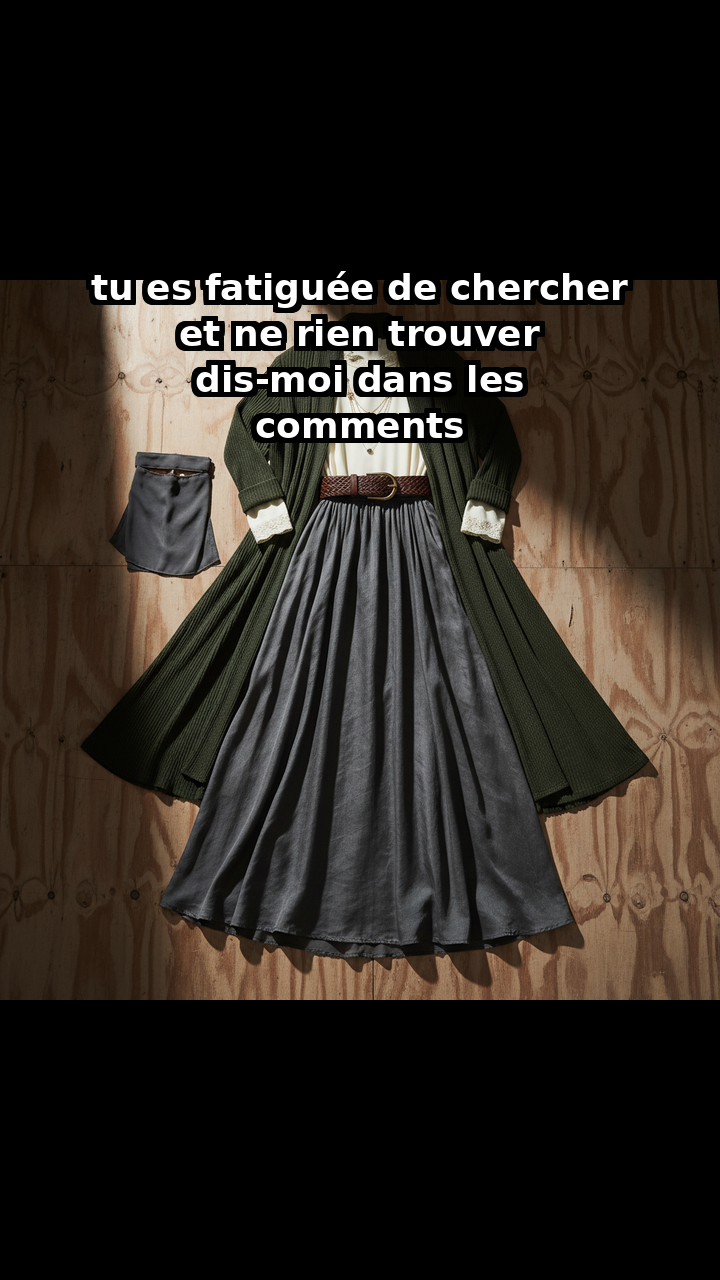
BEFORE:
AFTER:
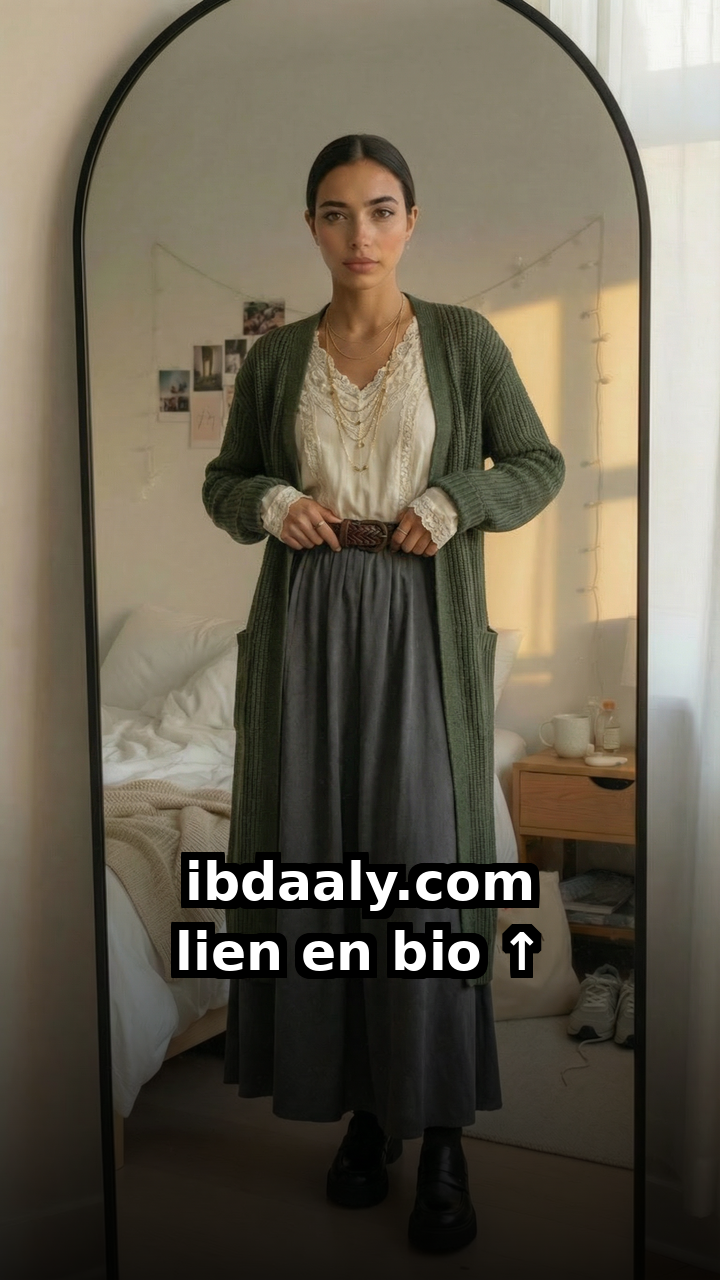
This transformation is not just about aesthetics; it's about connection. Seeing a garment on a model helps customers visualize themselves wearing it, understanding the fit, drape, and overall style in a way that a static image simply cannot convey.
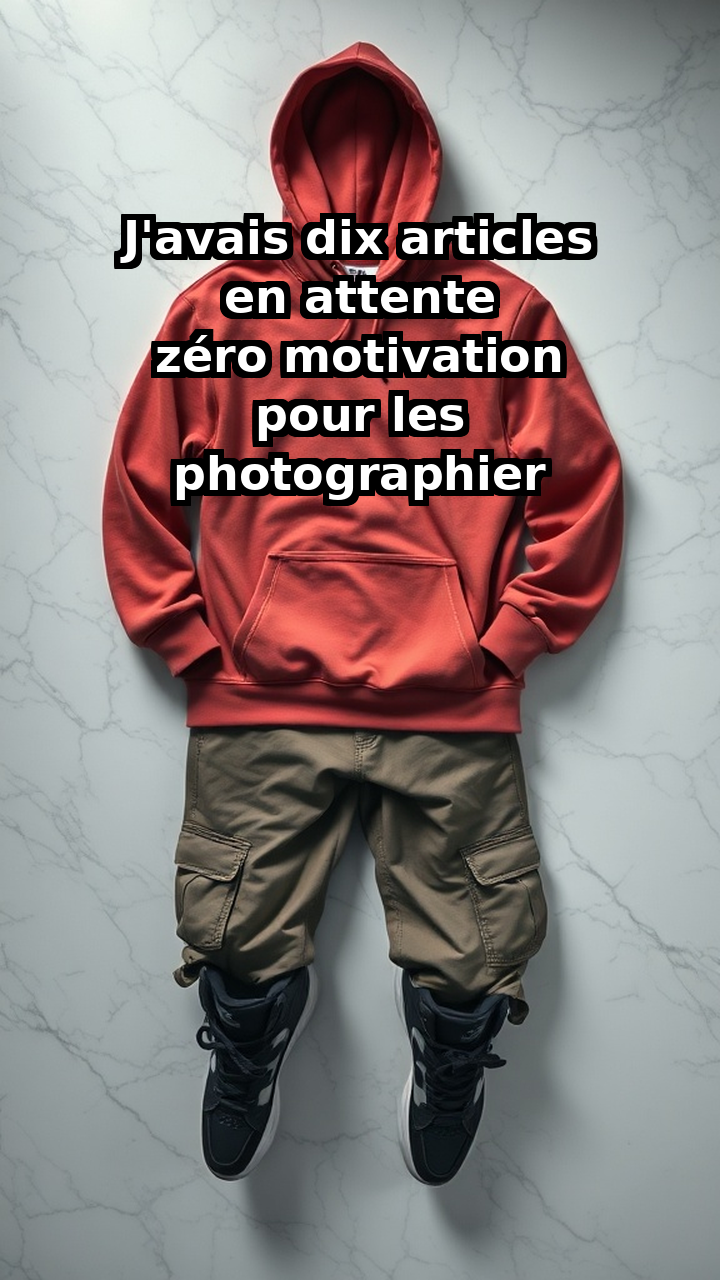
BEFORE:
AFTER:
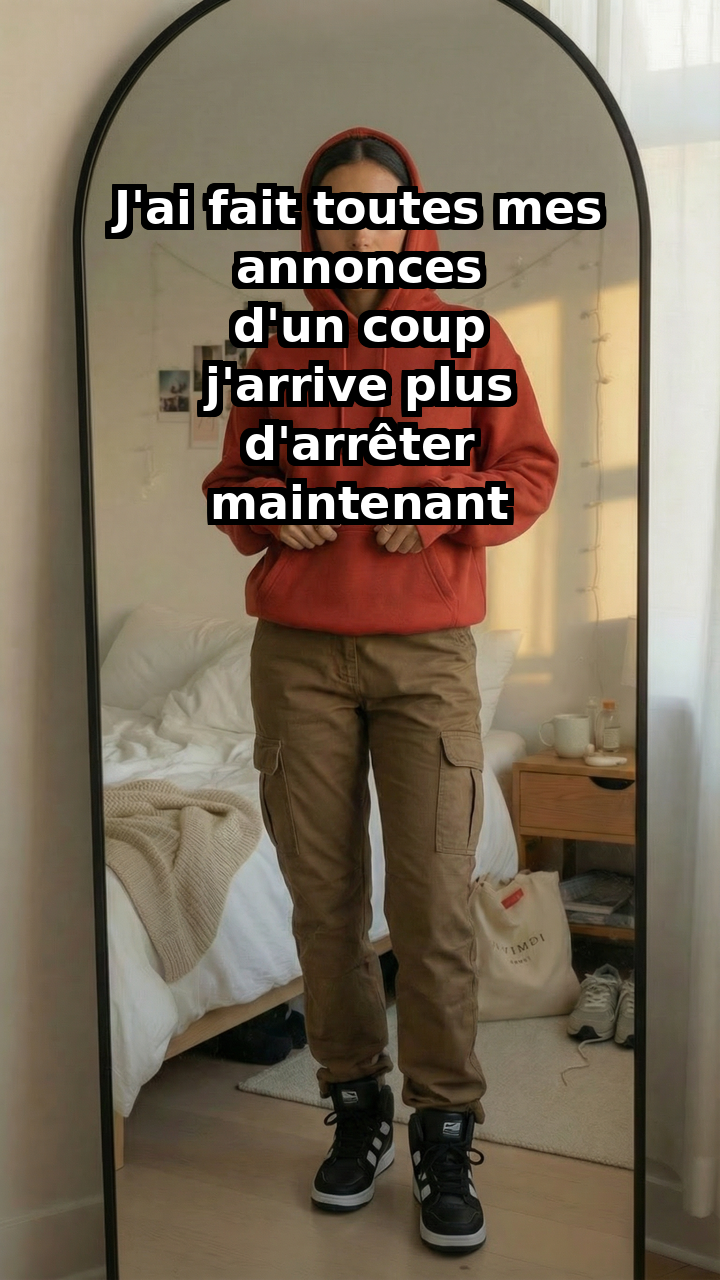
You've put in the effort to take great product photos at home, but what if you could take them to the next level without expensive photoshoots? Imagine showcasing your beautiful garments on diverse models, without ever hiring one. Ibdaaly.com can transform your carefully captured product images into stunning model photos, giving your online store a professional edge and helping you connect with more customers. Try it today and see your sales soar!